| Tech
Chat |
 |
Hotchkis Performance Sway Bar Install
Last
month we lowered my 1998 Dodge Dakota with a Hotchkis
Performance lowering kit. The Hotchkis Performance
lowering kit included 2” drop coil springs
for the front and 3” drop leaf springs for
the rear. We also installed a full set of the
specially valved Bilstien shocks.
This
month we continue with the installation of the
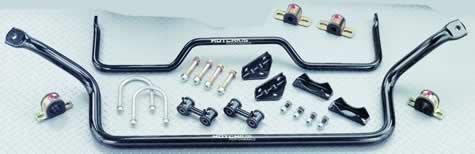
Hotchkis Performance sway bars. The sway bars
come with a 1 7/16” front bar, 1 5/16”
rear bar, and all the hardware to install. The
new bushings are made of polyurethane and are
greasable for long life. All the fasteners are
high quality grade 8 and the U-bolts are stainless
steel. The sway bars and end-links are powder
coated in gloss black. As you can see, this is
a very high quality kit.
We
started with the front. After jacking up the vehicle
and supporting it on jack stands, we removed the
front wheels. Removal of the factory front sway
bar is very easy, just unbolt the end link upper
nuts and remove the front bushing retainer bolts.
The bar will slide right out.
Before
installation, some grinding must be done to make
room for the new bar since it is thicker. The
corner of the bump stop pad must be ground down
about a 1/4". Once that is done, the new
bar can be installed. The inside of new bushings
must be greased with white silicone grease. Hotchkis
provides the grease with the kit. The new bushings
are installed over the bar so the split faces
the front of the truck. The bar is installed on
the truck by attaching the new bushings and brackets
to the truck. After that is done, you will want
to rotate the bar up and down to make sure that
the areas you just ground give you enough clearance.
Once everything checks out, install the end link
onto the sway bar and tighten everything down
to torque specs. Put the wheels back on and let
the truck down. Now it is time for the back.
The
rear of the truck is pretty straight forward.
My truck did not come with a factory sway bar
in the rear. If the truck did come with a rear
sway bar, I would have used the brackets welded
to the axle and of course had to remove the old
sway bar. The first thing was to install the new
end link brackets. The install into the existing
holes on the frame and include all the bolts and
nuts for installation. Next I greased the end
of the end links before installing them into the
new brackets. I placed the stainless steel U-bolts
over the axles. The bushings where greased and
installed with the slit facing the front of the
truck. The bar was installed onto the new U-bolts.
Next I attached the bar to the end links and tightened
everything down.
After
the truck was back down on the ground, it was
time to see if this did any good. I took the truck
out and hit some pretty good corners. All I can
say is, “WOW.” The truck corners much
better and the ride is much smoother. I can take
corners harder. The truck is much more of a pleasure
to drive. The guys at Hotchkis Performance did
one hell of a job on this kit. Everything needed
was included. Hotchkis even includes detailed
instructions on this. Well until next month, it
is time to drive some more.
Vincent Wright
sales@kmwperformance.com
http://www.kmwperformance.com

|