Text,
Install and Photos by Toby Mosholder
This
month we will show you how I installed
the 8 piece Step notch into my 1992
C-1500. Let me start by saying this
was a major decision for me. I still
use my truck as a truck and cutting
the bed floor out was a huge hurdle
for me. But, the end result is a much
lower truck that rides great.
We start with pulling the bed off,
then jack the truck up and secure
it on jack stands. I put two in the
front just behind the front tires.
And two at the extended cab just before
the frame curves up. Finally, two
more at the very rear of the frame
rails.
The first measurement you will need
is the axle centerline. This is critical!
This is the most important measurement
on this install. If you do not get
it right then the axle will not sit
in the notch properly when the truck
is lowered. Measuring the distance
from the rear of the frame rail to
the axle, is 51.03 inches. Mark this
measurement on each rail. This is
called axle centerline. And will be
referred to as such in the rest of
the article.
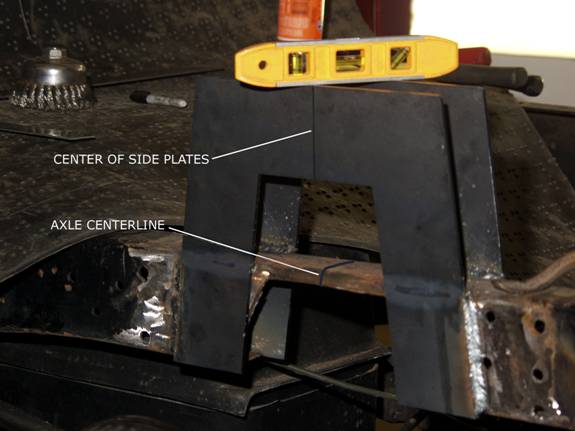
Now
turn your attention to the notch plates.
Measure across the top of the side
plate and find center, mark that as
well. With all four side plates marked
center you are ready to place two
side plates on the frame and clamp.
Line up the center line of the side
plate to the axle centerline. I used
a square to line up the two marks.
The bottom of the side plates should
be flush with the bottom of the frame
rail.
With
a level check level across the two
side plates shown in above picture.
Once the two side plates are level
across the frame rail now check level
vertically on both side plates.
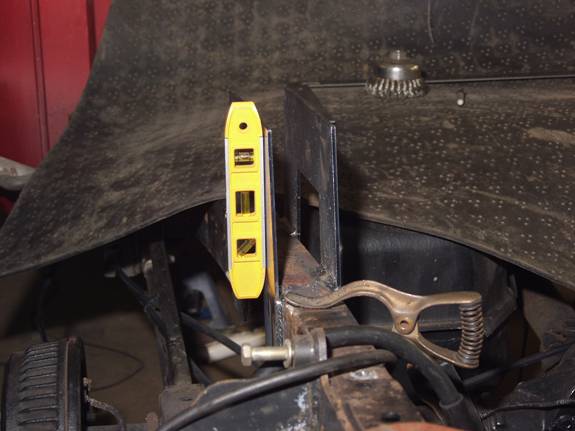
Once
they are level in both directions
you are ready to weld them to the
frame rail. When the six welds on
each plate are completed let the rail
cool for a few minutes while you get
ready to install the top cap.With
the top cap in hand set it on the
outside frame rail side plate. And
mark the top cap where it contacts
the top of the frame rail and trim
to fit flush on the frame. Place the
top cap on the frame now and position
where it needs to be welded in. And
weld the top cap to the side plates.
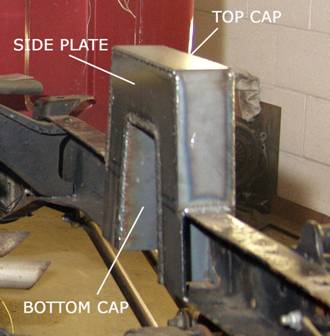
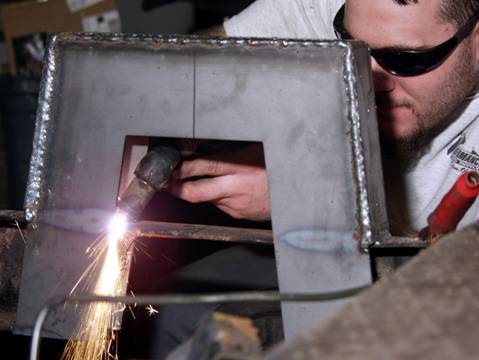
After
the top cap is welded in you are ready
to cut the stock frame rail out. We
used a Plasma cutter, but a customizers
best friend (saw-z-all) will work
just fine.
After you cut out the stock frame rail you can install the
bottom cap. You may need to grind
a little of the stock frame away for
the bottom cap to fit properly. When
the bottom cap sits flush against
the side plates clamp it tight. Weld
the bottom cap to the side plates.
Upon completing this weld you are
ready to clean up all the welds on
the notch, and move to the other side
and repeat the process. -
After both sides are installed it is time for the bridge
between the notches. This eliminates
twisting flex in the notches and makes
them extremely sturdy. There are several
different ideas people use and the
most creative part of the installation.
I chose to just run a single 1 3/4
chrome moly tube. Some people use
this bridge to mount the upper part
of there air bag or hydraulic cylinders.
So the ideas are endless. Whatever
you decide to install just make sure
it is level and square between the
frame rails.
Are you ready to cut the bed floor out? I stood the bed up
on the front vertically and used the
bottom of the bed to make and mark
all my measurements and cuts. Using
the fender wells. I measured the length
and found center of the fender well
and marked it on the bottom of the
bed. Go measure the total length of
the notch along a single rail.
Center the length measurement on the mark you made for the
center of the fender wells and mark.
Measure the distance between the fender wells of the bed
and find center and mark. Go back
to the frame rails and measure across
the rails to get the width of the
notch. Center that measurement between
the fender wells and mark. On the full-size Chevys the frame rails taper towards the
rear of the truck so you will need
to measure the front and rear of the
notch. Add however much space you
want between the notch and bed floor.
Double check your measurements and make your cuts. Dress
the edges of the sheet metal with
a rust proofing material of some kind,
and reinstall the bed.
Special thanks go to TR Manufacturing
in Ft. Wayne Indiana for supplying
the step notch for this install.
This 8 Piece step notch is available
for purchase at gauge online store
at this link. store.gaugemagazine.com/index.asp?PageAction=VIEWPROD&ProdID=1681 |